A Virtual Private Server (VPS) offers an ideal compromise between shared hosting and dedicated servers. It gives you dedicated resources, greater control, and scalable performance—without the higher cost of a dedicated machine. For developers and advanced users, managing a VPS without a control panel can lead to improved performance and tighter security, but it requires a more hands-on approach.
If you’re using a self-managed VPS without cPanel or any GUI-based interface, this guide will walk you through every step to get your website live—starting from scratch using only the command line.
Prerequisites to Host Websites Without a Control Panel
Hosting without a control panel means you’ll manually install and configure every necessary service. Before diving in, ensure you have the following:
- A Linux-based VPS plan with root access.
- An active domain name.
- Familiarity with the command line and SSH.
- A stable internet connection for remote configuration.
We’ll be using the popular LAMP stack (Linux, Apache, MySQL, PHP) in this tutorial to host a WordPress website—one of the most common configurations.
Note: While it’s possible to install WordPress on Windows, Linux offers better performance, community support, and compatibility.
Step 1: Connect to Your Server via SSH
Once your VPS is deployed, connect to it using SSH.
A. Using an SSH Client (like PuTTY)

- Download and install PuTTY.
- Enter your VPS IP address and SSH port (default is usually 22).
- Click Open and log in using your root credentials.
B. Using Your Local Command Line
For MacOS, Linux, or Windows PowerShell, use this command:
ssh root@your_server_ip -p22
Replace your_server_ip and -p22 with your actual IP and SSH port.
Once logged in, you’re ready to start server configuration.
Step 2: Install Apache Web Server
Apache is a widely used open-source web server and perfect for hosting dynamic websites.
A. For Debian/Ubuntu:
sudo apt update

sudo apt install apache2 -y
B. For CentOS/RHEL:
sudo dnf update

sudo dnf install httpd -y
C. For openSUSE:
sudo zypper refresh

sudo zypper install apache2
D. Start and Enable Apache:

To test if Apache is working, visit your VPS IP address in a browser—you should see the default Apache welcome page.
Step 3: Install PHP
PHP allows your server to interpret and execute dynamic scripts. Let’s install PHP and the necessary extensions.
A. Debian/Ubuntu:
sudo apt install php php-cli php-mysql php-curl php-gd php-mbstring php-xml -y
B. CentOS/RHEL:
sudo dnf install php php-cli php-mysqlnd php-curl php-gd php-mbstring php-xml -y
C. openSUSE:
sudo zypper install php php-cli php-mysql php-curl php-gd php-mbstring php-xml D. Restart Apache:
sudo systemctl restart apache2 E. Verify PHP installation:
php -v Step 4: Install MySQL
MySQL is the database that stores your website’s content and user data.
A. Debian/Ubuntu:
sudo apt install mysql-server -yB. CentOS/RHEL:
sudo dnf install mysql-server -y C. openSUSE:
sudo zypper install mysql mysql-client Then, enable and start MySQL:
sudo systemctl start mysql

sudo systemctl enable mysql
Step 5: Set Up a Virtual Host
Virtual hosts allow multiple websites to run on a single server by assigning separate configurations.
A. Create a Directory for Your Website:
sudo mkdir -p /var/www/yourdomain.com/public_html
Set permissions:
sudo chown -R $USER:$USER /var/www/yourdomain.com/public_html

sudo chmod -R 755 /var/www
B. Create a Sample Page:
nano /var/www/yourdomain.com/public_html/index.html
Paste the following and save:
<html>
 <head><title>Welcome!</title></head>
 <body><h1>Website Hosted Without Control Panel</h1></body>
</html>
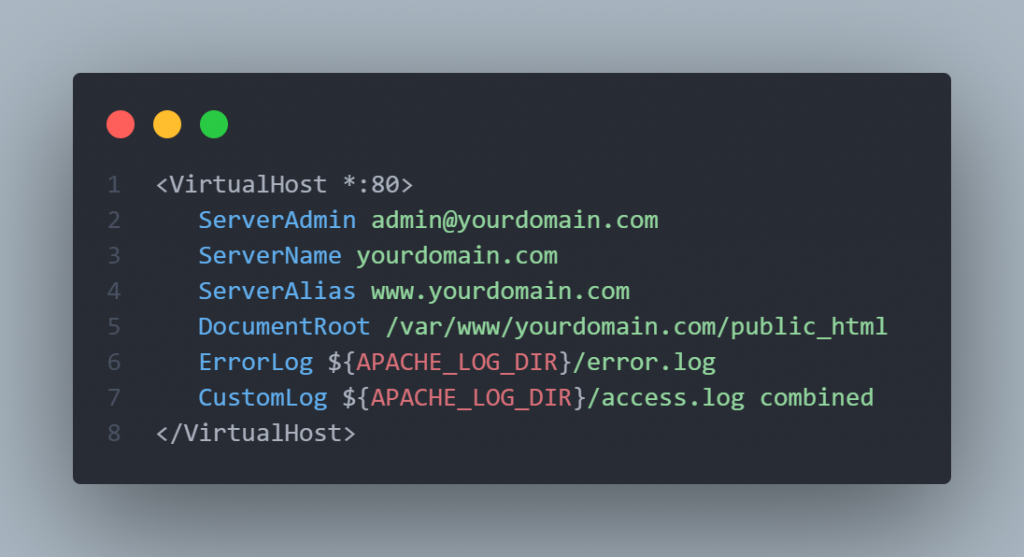
C. Configure Apache Virtual Host:
For Ubuntu/Debian:
sudo nano /etc/apache2/sites-available/yourdomain.com.conf For CentOS:
sudo nano /etc/httpd/conf.d/yourdomain.com.conf Add this content:

D. Enable and reload Apache:
sudo a2ensite yourdomain.com.conf

sudo systemctl reload apache2
You should now see your test page by visiting your domain or IP.
Step 6: Upload Website Files or Install WordPress
A: Upload Files via FTP
Use FileZilla or WinSCP and connect via SFTP using your VPS IP and credentials. Upload your website files into the /public_html directory.
B: Install WordPress via Command Line
Navigate to your website root:
cd /var/www/yourdomain.com/public_html Download and extract WordPress:
wget https://wordpress.org/latest.tar.gz
tar xfz latest.tar.gz
mv wordpress/* ./
rm -rf wordpress latest.tar.gz
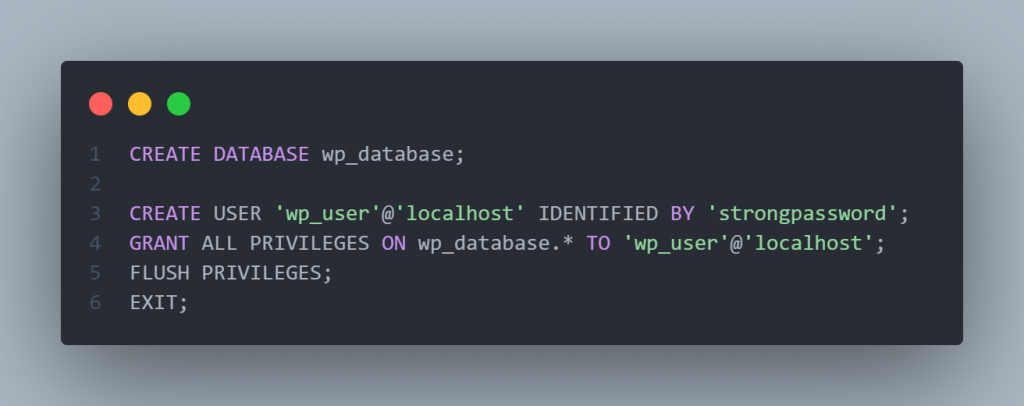
Step 7: Create a MySQL Database and User
Log in to MySQL:
mysql -u root -p Inside the MySQL shell:

Step 8: Complete the CMS Installation
Go to http://yourdomain.com and follow the WordPress setup wizard:
- Enter your database name, user, and password.
- Choose your site title, admin username, and password.
Once setup is complete, you’ll be redirected to the WordPress dashboard.
Step 9: Secure Your Website with SSL
Use Let’s Encrypt to install a free SSL certificate:
sudo apt install certbot python3-certbot-apache -y

sudo certbot --apache -d yourdomain.com -d www.yourdomain.com
Renew certificates automatically:
sudo certbot renew --dry-run VPS Malaysia: Managed vs Self-Managed Options
At VPS Malaysia, we offer both managed and self-managed VPS hosting plans, suitable for both beginners and professionals.

Self-Managed VPS:
- Full root access.
- Choose from Linux or Windows.
- Ideal for developers, agencies, and traders.
Managed VPS:
- Pre-installed WordPress, PHP, MySQL, SSL & more.
- 24/7 monitoring and expert support.
If you prefer control and customization, go with self-managed. For convenience and ease of use, a managed VPS is your best bet.
Final Thoughts
Hosting a website manually on a VPS is a rewarding experience that gives you complete control over your hosting environment. From improved performance and enhanced security to reduced costs, the benefits are numerous.
However, it does require a bit more time, patience, and technical know-how.
Whether you’re spinning up a test environment, deploying a client’s website, or running a secure trading app, VPS Malaysia self-managed plans offer the flexibility you need. And if you’d rather avoid the manual work, you can always go with a managed VPS with SPanel, giving you the best of both worlds.
FAQs: VPS Hosting Without a Control Panel
Q1. Is cPanel mandatory for VPS hosting?
No. You can configure a VPS entirely through the command line. Control panels are optional but useful for less experienced users.
Q2. Can beginners manage a VPS without a GUI?
Yes, but there’s a learning curve. Tutorials like this one, paired with practice, make the process approachable.
Q3. What’s better—Linux or Windows VPS?
For hosting websites, Linux VPS is preferred due to its stability, flexibility, and community support.
Q4. How do I back up a website without a control panel?
You can schedule backups using cron jobs and tools like rsync, mysqldump, or cloud storage CLI utilities (e.g., AWS CLI).
Q5. Can I run multiple websites on one VPS?
Absolutely. Using virtual hosts in Apache or Nginx, you can host multiple domains on a single VPS.


Leave a Reply